SMS Notification In Laravel 10 With Vonage
If you want to verify the user's phone number or send a welcome message or payment successfully message on the user's phone number then you need to add SMS functionality in your app.
To implement SMS functionality in your app, you will need a 3rd party's API (SMS Gateway) which will give you SMS services. So there are many 3rd party services available which give you their services and charge accordingly. Below I am giving you some SMS gateway that you can use in your app.
List of SMS gateway:
- Twilio
- Plivo
- Vonage(Nexmo)
In this tutorial, we will use Vonage's SMS (formerly known as Nexmo) Services because the official documentation of Laravel recommends that.
Generate Vonage key and secret
go to vonage.com and create your account and get the Vonage key and secret.
Now Go to communications APIs and create your account.

Now Create Your Account with verification or email and phone number.
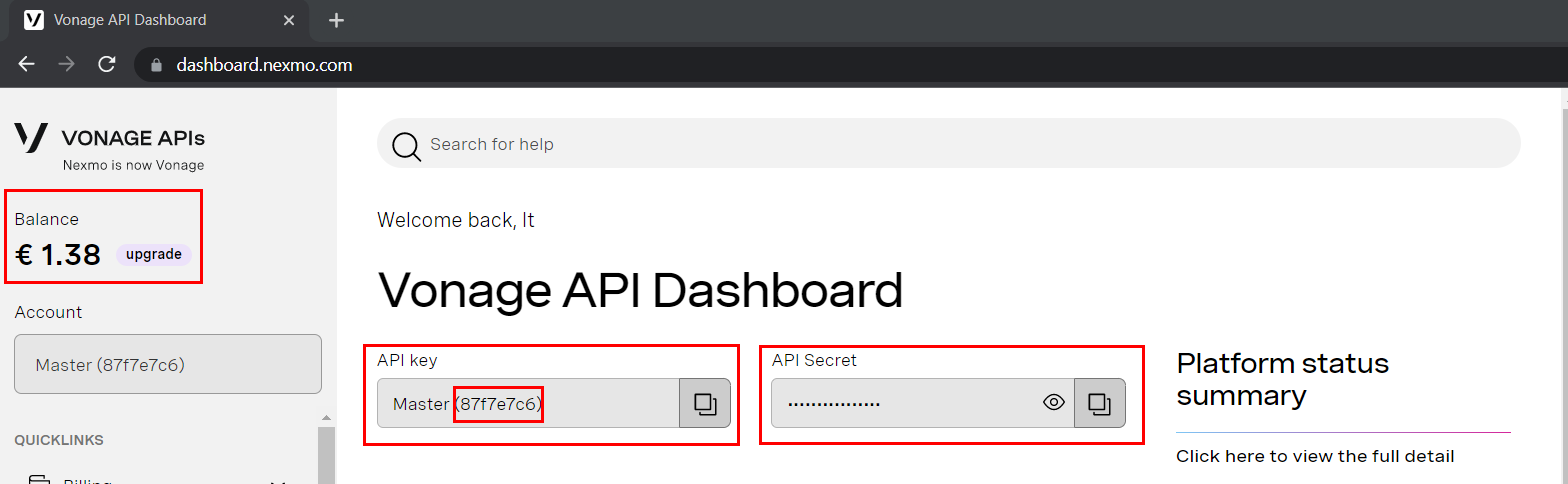
After Creating your account it will give you a key and secret code which you can use in your app.

After creating an account, you will redirect to dashboard page and here you can see your key and secret. Now copy your key and secret and paste it to the .env file of your Laravel app or save this in your system for further use.
Implementation:
There are two ways to implement Vonage in the Laravel app:
- using vonage/client package.
- laravel/vonage-notification-channel and guzzlehttp/guzzle packages.
So in this tutorial, we will explain both methods and after that, you can use any method in your app according to the requirements.
Method 1: Using Vonage/Client Package
This method is very easy to implement because this method has no need for extra affords. Follow the below steps to implement this method.
Step 1: Create laravel app :
laravel new laravel-sms-notificationStep 2: Go to the project directory :
cd laravel-sms-notificationStep 3: Install vonage/client package :
composer require vonage/clientStep 4: Set up Vonage key and secret in the .env file
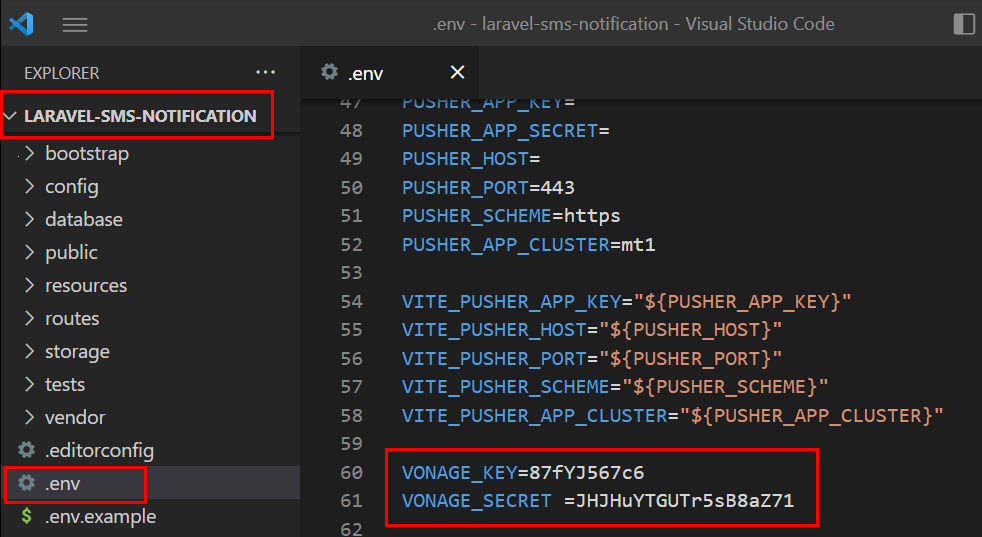
go to the .env file and put the Vonage key and secret at the end of the file.
VONAGE_KEY=87f7e7Y789VONAGE_SECRET =JHJhYHTkUTr5sB8aZ71
Step 5: Register these .env's Vonage key and secret in the config/auth.php file.
Go to the config/auth.php file and here your can register the .env file's data for fast access.
'vonage_key'=>env('VONAGE_KEY'),'vonage_secret'=>env('VONAGE_SECRET'),

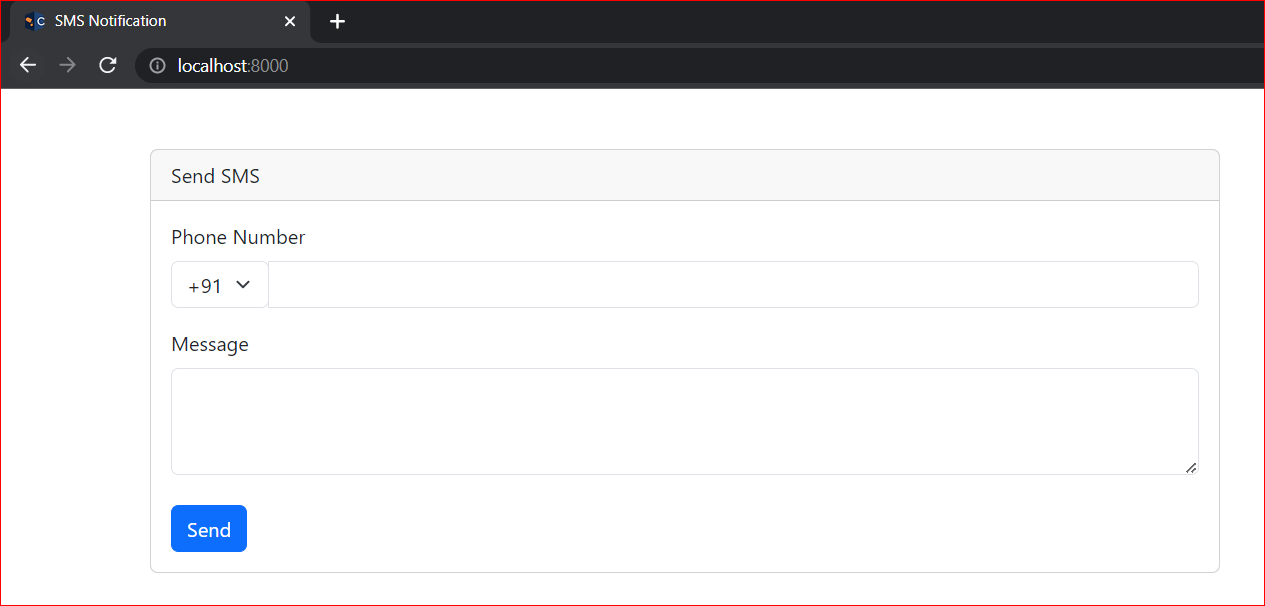
Step 6: Set up UI in welcome.blade.php :
<!DOCTYPE html><html lang="en"><head><meta charset="UTF-8"><meta name="viewport" content="width=device-width, initial-scale=1.0"><meta http-equiv="X-UA-Compatible" content="ie=edge"><title>SMS Notification</title><link href="https://cdn.jsdelivr.net/npm/bootstrap@5.3.0-alpha3/dist/css/bootstrap.min.css" rel="stylesheet"><script src="https://cdn.jsdelivr.net/npm/bootstrap@5.3.0-alpha3/dist/js/bootstrap.bundle.min.js"></script><style>input[type=number],textarea,select{box-shadow: none !important;}</style></head><body><div class="container mt-5"><div class="row"><div class="col-sm-8"><div class="card"><div class="card-header">Send SMS@if(session('success'))<span class="text-success fw-bold">{{session('success')}}</span>@endif@if(session('error'))<span class="text-danger fw-bold">{{session('error')}}</span>@endif</div><div class="card-body"><form action="/send-sms" method="post">@csrf<div class="mb-3"><label for="phone" class="form-label">Phone Number</label><div class="input-group mb-3"><div><select name="country_code" class="form-select" required><option value="91">+91</option><option value="1">+1</option><option value="61">+61</option></select></div><input type="number" name="phone_number" class="form-control" id="phone" required></div></div><div class="mb-3"><label for="message" class="form-label">Message</label><textarea name="message" class="form-control" id="message" rows="3" required></textarea></div><button class="btn btn-primary mt-2" class="mt-2">Send</button></form></div></div></div></div></div></body></html>
Step 7: Create a controller :
php artisan make:controller SMSControllerStep 8: Go to the controller and write logic.
<?phpnamespace App\Http\Controllers;use Illuminate\Http\Request;class SMSController extends Controller{public function index(Request $request){//validate the phone numberif(strlen($request->phone_number)<>10){return back()->with('error','only 10 digits number allowed');}//get all requested data$country_code=$request->country_code;$phone=$country_code.$request->phone_number;$message=$request->message;//add vonage configuration$basic = new \Vonage\Client\Credentials\Basic(config("auth.vonage_key"), config("auth.vonage_secret"));$client = new \Vonage\Client($basic);//send msg api of vonage$response = $client->sms()->send(new \Vonage\SMS\Message\SMS($phone,'Vaidikalaya',$message));//get the response$res = $response->current();if ($res->getStatus() == 0) {return back()->with('success','The message was sent successfully');} else {return back()->with('error','The message failed');}}}
Step 9: Setup routes :
<?phpuse Illuminate\Support\Facades\Route;use App\Http\Controllers\SMSController;Route::get('/', function () {return view('welcome');});Route::post('/send-sms',[SMSController::class,'index']);
Step 10: Test your app :
Run your app
php artisan serveOUTPUT
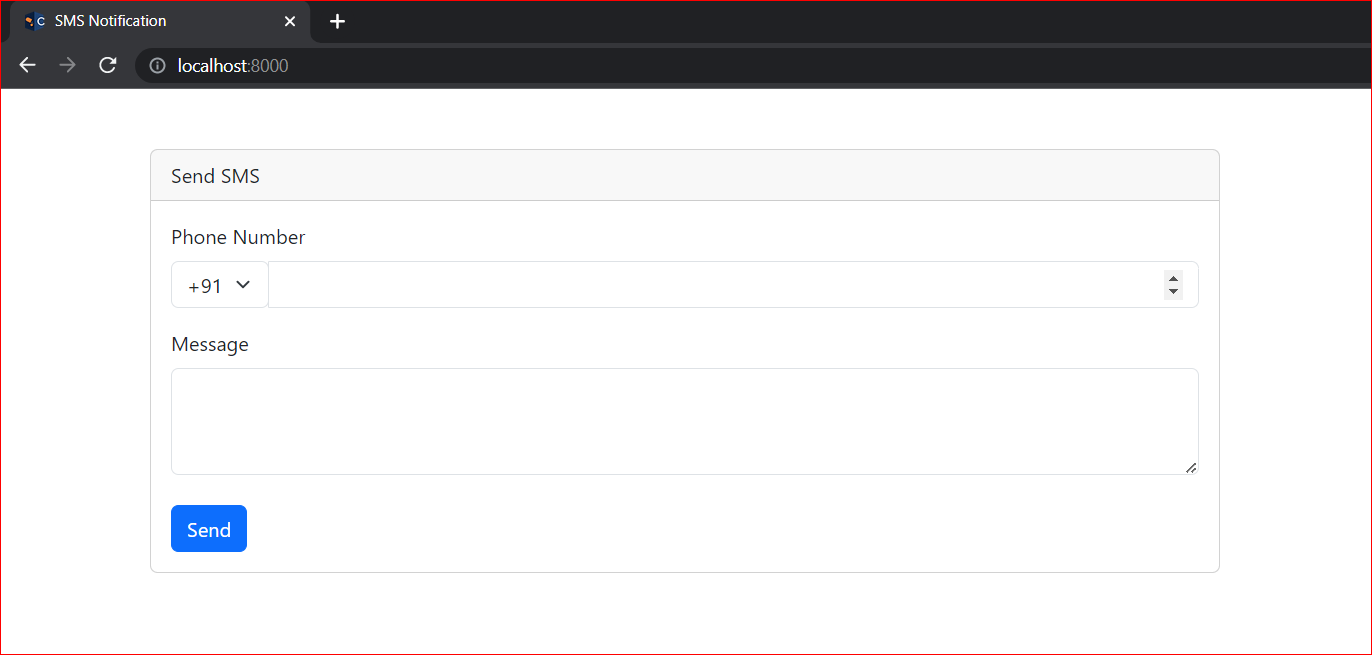
Go to your browser and run your app at localhost:8000

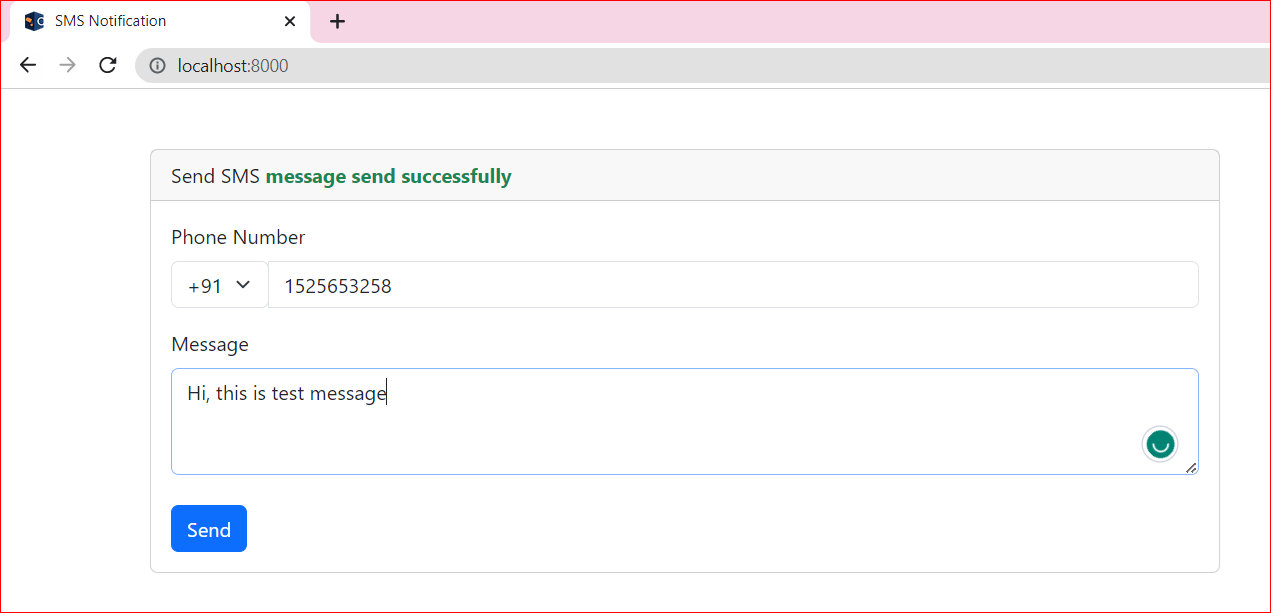
Now fill in your phone number with your country code and write a message then click on send button.

The first method is completed. Now try method 2
Method 2: Using laravel/vonage-notification-channel and guzzlehttp/guzzle packages :
This method uses Laravel's notification channel. So in this method, we create controller and notification classes separately.
Step 1: Create laravel app :
laravel new laravel-sms-notificationStep 2: Go to the project directory :
cd laravel-sms-notificationStep 3: Install laravel/vonage-notification-channel guzzlehttp/guzzle package :
composer require laravel/vonage-notification-channel guzzlehttp/guzzleStep 4: Set up Vonage key and secret in the .env file
go to the .env file and put the Vonage key and secret at the end of the file.
VONAGE_KEY=87f7e7Y789VONAGE_SECRET=JHJhYHTkUTr5sB8aZ71VONAGE_SMS_FROM=15556666666
When using laravel/vonage-notification-channel guzzlehttp/guzzle package then no need to register these keys and secret to anywhere. Laravel automatically fetches and uses these keys.
Step 5: Set up UI in welcome.blade.php
Use the previous blade file for UI.
Step 6: Create notification class :
php artisan make:notification SMSNotification
Step 7: Create a controller :
php artisan make:controller SMSControllerStep 8: Go to the controller and write logic.
NOTE: In this method, you will need to import Facades Notification for sending messages and Notification class which was created in the 6th step.
use Illuminate\Support\Facades\Notification;
use App\Notifications\SMSNotification;
<?phpnamespace App\Http\Controllers;use Illuminate\Http\Request;use Illuminate\Support\Facades\Notification;use App\Notifications\SMSNotification;class SMSController extends Controller{public function index(Request $request){//validate the phone numberif(strlen($request->phone_number)<>10){return back()->with('error','only 10 digits number allowed');}//get all requested data$country_code=$request->country_code;$phone=$country_code.$request->phone_number;$message=$request->message;//call SMSNotification class with notification on demand method$res=Notification::route('vonage',$phone)->notify(new SMSNotification($message));return back()->with('success','message send successfully');}}
Step 9: Configure SMSNotification Class :
Go to App\Notifications\SMSNotification.php class. And configure according to given below points.
- First, add the Illuminate\Notifications\ Messages\VonageMessage class
use Illuminate\Notifications\Messages\VonageMessage;
- Configure constructor :
public $message;public function __construct($message){$this->message=$message;}
- Change the notification channel main to vonage
public function via(object $notifiable): array{return ['vonage'];}
- Define a toVonage method on the notification class. This method will receive a $notifiable entity and should return an Illuminate\Notifications\ Messages\VonageMessage instance:
public function toVonage(object $notifiable): VonageMessage{return (new VonageMessage)->content($this->message);}
Full Configured code of SMSNotification Class. You can copy and paste this code on your SMS Class.
<?phpnamespace App\Notifications;use Illuminate\Bus\Queueable;use Illuminate\Contracts\Queue\ShouldQueue;use Illuminate\Notifications\Notification;use Illuminate\Notifications\Messages\VonageMessage;class SMSNotification extends Notification{use Queueable;//geting data comming from controllerpublic $message;public function __construct($message){$this->message=$message;}//here write the channel namepublic function via(object $notifiable): array{return ['vonage'];}public function toVonage(object $notifiable): VonageMessage{return (new VonageMessage)->content($this->message);}public function toArray(object $notifiable): array{return [//];}}
Step 10: Run your app and test.
Start your app :
php artisan serve
Run on browser :